10 Essential Video Editing Tips: Speed Up Your Workflow in Adobe Premiere Pro
Efficient video editing is crucial in the fast-paced creative digital industry. It helps streamline production, meet tight deadlines, and maintain high-quality output. By adopting efficient practices, editors can significantly enhance their productivity and deliver polished results swiftly.
This guide covers essential tips for speeding up your workflow in Adobe Premiere Pro. From mastering keyboard shortcuts to utilising proxy files, these strategies will not only save time but also improve overall editing performance.
Applying these 10 essential video editing tips can drastically speed up your workflow, allowing you to focus more on the creative aspects of your projects. Dive in and discover how to transform your editing process with ease.
Explore more about the benefits of video marketing for businesses and the future of video marketing.
1. Master Keyboard Shortcuts in Adobe Premiere Pro
Premiere Pro keyboard shortcuts play a vital role in improving video editing efficiency. By reducing the number of clicks and mouse movements, they significantly speed up your workflow.
Benefits of Using Keyboard Shortcuts
- Increased Speed: Execute common tasks quickly without navigating menus.
- Enhanced Focus: Maintain concentration on your editing timeline rather than searching for commands.
- Reduced Fatigue: Minimise repetitive strain by limiting mouse usage.
Essential Shortcuts to Know
Here's a quick list of essential shortcuts that can transform your editing process:
- Ctrl + K (Cmd + K on Mac): Cut at playhead
- V: Select tool
- C: Razor tool
- Spacebar: Play/stop
- Ctrl + Z (Cmd + Z on Mac): Undo
- Ctrl + Shift + Z (Cmd + Shift + Z on Mac): Redo
- Shift + Delete: Ripple delete
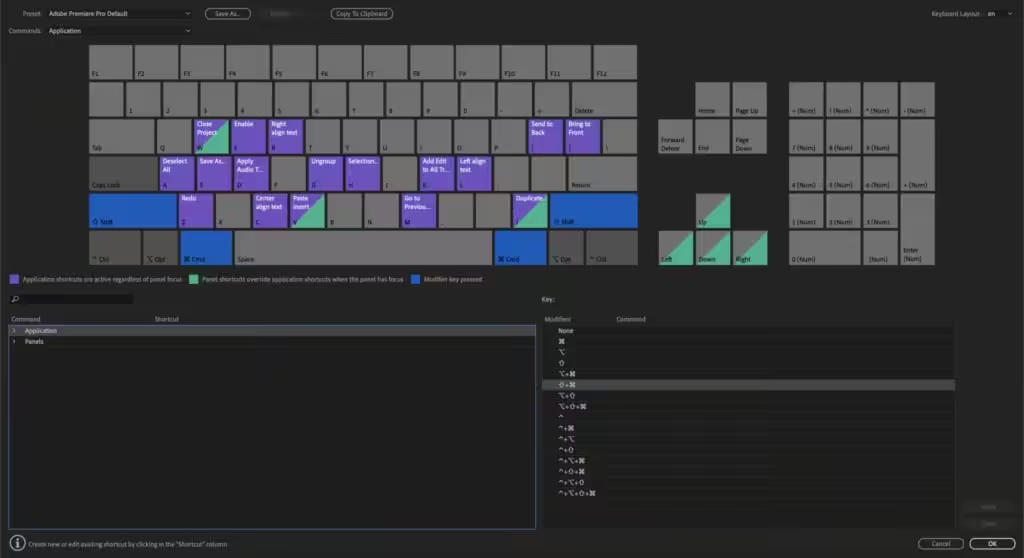
Customising Shortcuts for Personal Workflow
Customising shortcuts can tailor Premiere Pro to fit your unique editing style:
- Navigate to Edit > Keyboard Shortcuts in Premiere Pro.
- Use the search bar to find specific commands.
- Modify existing shortcuts or add new ones by clicking on the command and pressing the desired key combination.
Implementing these tips ensures a more efficient and enjoyable editing experience.
2. Organise Your Project Efficiently for Seamless Editing Experience
Effective organisation of your project files is crucial to maintaining a smooth and efficient editing process. Disorganised files can lead to wasted time searching for assets, disrupting your creative flow.
Strategies to organise files in Adobe Premiere Pro:
- Colour-Coding: Assign colours to different types of clips (e.g., interviews, B-roll, graphics). This visual distinction helps you quickly identify the type of content you are working with.
- Labeling: Use descriptive labels for your bins and clips. For instance, label bins by scene, location, or type of shot. Clear naming conventions make it easier to locate specific assets.
Efficient file organisation allows you to focus on creativity rather than logistics, saving valuable time.
3. Utilise Proxy Files for Better Performance
Using proxy files is a game-changer in video editing, especially when working with high-resolution footage. Essentially, proxy files are lower-resolution copies of your original media that stand in while you edit. This reduces the strain on your system, allowing for smoother playback and more efficient editing.

Impact on Playback During Editing
Switching to proxy files improves playback speed, making it easier to apply edits in real-time without experiencing lag. This optimisation helps maintain a smooth workflow, allowing you to focus on creative decisions rather than technical limitations.
4. Adjust Playback Resolution
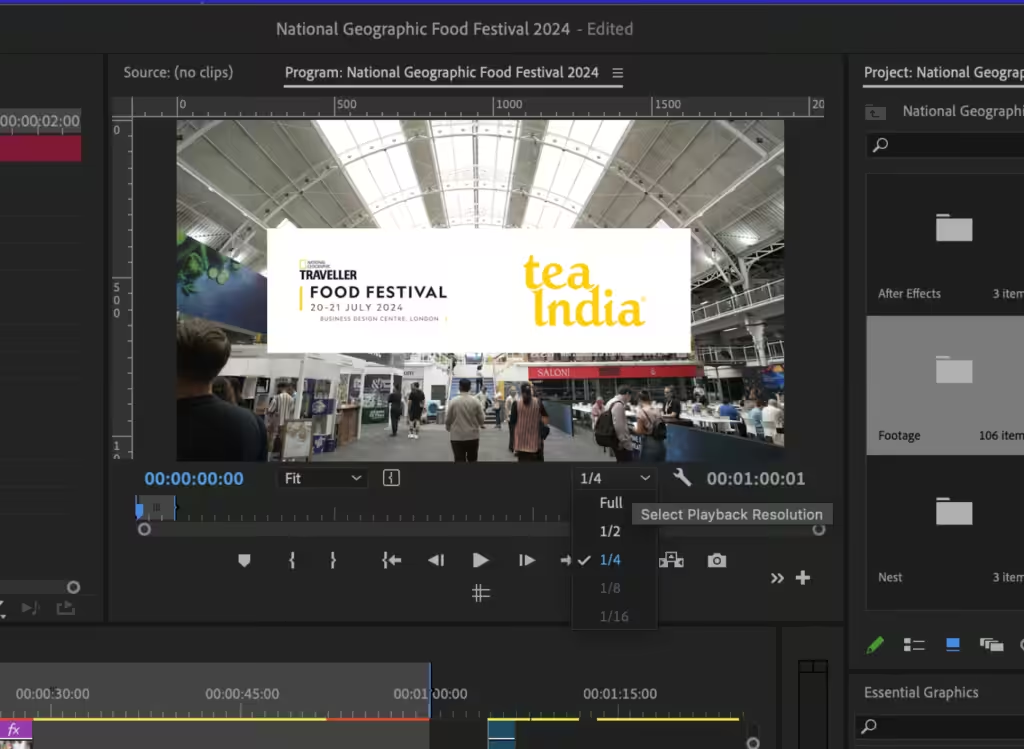
Adjusting playback resolution is crucial for a faster workflow and video editing efficiency. Lowering the playback resolution can significantly minimise lag, allowing smoother edits even with high-resolution footage.
Step-by-Step Guide on Changing Playback Settings:
Open Preferences:
1. Navigate to Edit > Preferences > Playback (Windows) or Premiere Pro > Preferences > Playback (macOS).
2. Playback Resolution:
- At the bottom right corner of the Program Monitor, select a lower resolution from the
Playback Resolutiondropdown menu (e.g., 1/2, 1/4).
3. Renderer Settings:
- In the
Playback Preferenceswindow, underRenderer, selectMercury Playback Engine GPU Accelerationif available for better performance, or switch toMercury Playback Engine Software Onlyif you encounter issues.
4. Audio Hardware:
- Under the
Audio Hardwarecategory in Preferences, ensure the correct audio device is selected for both input and output.
5. Video Device:
- In the
Playback Preferenceswindow, check the box next to the desired video output device if you have an external monitor connected.
5. Optimise Memory Management Techniques
Effective memory management is crucial for improving performance in video editing. Allocating RAM efficiently can significantly enhance your editing workflow across various software platforms.
How Memory Allocation Affects Performance
Memory allocation directly impacts how smoothly your software runs, influencing everything from playback to rendering times. Insufficient RAM can lead to lag, crashes, and increased frustration.
Tips for Optimising RAM Usage
In Adobe Premiere Pro:
- Go to Preferences > Memory
- Set the amount of RAM reserved for other applications lower, allowing more memory for Premiere Pro.
By following these steps, you can allocate resources more effectively, resulting in a smoother, faster editing experience.
6. Streamline Colour Grading with Adjustment Layers
Adjustment layers revolutionise colour grading, offering a streamlined approach to apply effects uniformly across multiple clips. These layers sit above your footage on the timeline, allowing you to make changes without altering the original clips.
Application Process:
1. Create an Adjustment Layer:
- In Adobe Premiere Pro, navigate to the Project Panel.
- Click on New Item and select Adjustment Layer.
- Drag the adjustment layer onto your timeline above the clips you wish to grade.
2. Apply Colour Grading:
- Select the adjustment layer.
- Use the Lumetri Color panel (or your preferred colour grading tool) to adjust settings like exposure, contrast, and saturation.
3. Extend or Trim as Needed:
- Adjust the length of the adjustment layer to cover all relevant clips.
- Any changes made will affect all clips beneath the layer, ensuring consistency in colour grading.
By leveraging adjustment layers, you enhance efficiency and maintain a cohesive look across your project.
7. Use Timeline Nesting Techniques for Complex Projects Management
Timeline nesting is a powerful technique that streamlines the management of long videos and complex edits. By grouping multiple clips into a single sequence, you can simplify your timeline, making it easier to navigate and apply global changes.
Advantages of Timeline Nesting
- Organised Workflow: Keeps your main timeline uncluttered, allowing for more focused editing.
- Global Adjustments: Apply effects or transitions to all clips in the nested sequence simultaneously.
- Simplified Review: Makes reviewing segments of your project more manageable.
Creating Nested Sequences in Premiere Pro
- Select Clips: Highlight the clips you want to nest in your timeline.
- Right-Click: Choose "Nest" from the context menu.
- Name Your Sequence: Give your nested sequence a relevant name for easy identification.
Using timeline nesting effectively can transform your workflow, giving you more control over complex projects and ensuring a smoother editing process.
8. Implement Time Remapping Techniques for Creative Storytelling Through Pacing Changes
Time remapping offers a powerful way to introduce dynamic pacing in your video projects. By manipulating the speed of your footage, you can create dramatic slow-motion effects or accelerate scenes to build tension.
Benefits of Time Remapping:
- Enhanced Emotional Impact: Slow down moments to emphasise emotion.
- Dynamic Visuals: Speed up repetitive actions to maintain viewer interest.
- Creative Transitions: Seamlessly transition between different scenes by adjusting speed.
How to Implement Time Remapping:
- Select Your Clip: Choose the segment you want to alter.
- Enable Time Remapping: In Adobe Premiere Pro, right-click the clip and select Show Clip Keyframes > Time Remapping > Speed.
- Adjust Keyframes: Use keyframes to set points where the speed will change.
- Fine-Tune the Ramp: Smooth out transitions between different speeds for a professional look.
Experiment with these techniques in Adobe Premiere Pro to unlock a new level of creative storytelling through pacing changes.
9. Simplify Audio Synchronisation Process
Achieving perfect audio synchronisation is crucial for a polished and professional video finish. Syncing audio in Premiere Pro can be seamlessly accomplished without the need for third-party plugins. Here’s how:
1. Manual Syncing
Use visual cues like claps or spikes in the waveform to manually align audio with video.
2. Automated Syncing
Select your audio and video clips, right-click, and choose Synchronise. Premiere Pro will match the waveforms automatically.
3. Multicam Editing
For projects with multiple camera angles, use the Multicam feature to sync audio across all angles efficiently.
Maintaining audio quality is essential. Always monitor levels to avoid clipping and ensure clear sound throughout the edit.
10. Enhance Edits with Masking Effects
Masking effects are crucial in professional video editing, enabling editors to create visually stunning compositions by isolating or concealing specific parts of a clip. These effects are vital for achieving complex visual tricks, such as:
- Hiding unwanted elements: Seamlessly remove distractions from your footage.
- Creating transitions: Smoothly blend scenes together for a more engaging narrative.
- Highlighting subjects: Direct attention to key parts of your video.
Creative Uses for Masking
- Invisible cuts: Make transitions between scenes unnoticeable.
- Text reveals: Animate text to appear from behind objects.
- Split screens: Display multiple scenes simultaneously for dynamic storytelling.
Applying Masking Effects in Adobe Premiere Pro
- Select the clip you want to mask in the timeline.
- Navigate to the Effects Control panel and select the Opacity section.
- Use the Pen Tool to draw your mask directly on the preview screen.
- Adjust the mask's properties, such as feathering and opacity, for a polished look.
Masking effects and the aforementioned techniques are not limited to Adobe Premiere Pro; similar techniques can be applied in other software like Final Cut Pro and DaVinci Resolve, enabling you to enhance your edits across platforms.
Conclusion
Mastering these ten essential tips is a surefire way to improve your video editing skills and speed up your workflow. By integrating keyboard shortcuts, organising your project efficiently, utilising proxy files, and optimising memory management techniques, you lay the foundation for a smoother editing process.
Exploring advanced methods like timeline nesting, time remapping, and masking effects opens up creative possibilities that can elevate your work to a professional level.
We encourage you to practice these techniques regularly to see tangible improvements in your editing efficiency. Feel free to share your experiences or any additional tips that have worked for you in the comments below. Your insights could be invaluable to fellow editors looking to enhance their workflow!
If this article has been useful, let us know!
Editing takes skill and storytelling. Our video production services handle filming and edits to make content shine.
